Mixing methods compared: straight dough, sponge-and-dough, Chorleywood and activated dough development
A practical guide for professional bakers to understand the four principal bread mixing methods — straight dough, sponge-and-dough, Chorleywood Bread Process (CBP) and Activated Dough Development (ADD) — and how to choose between them. Covers gluten development science, fermentation parameters, the role of bread improvers in each method, critical process parameters (dough temperature, proofing, baking), staling, and a comprehensive fault→cause→remedy table. Process data from IREKS Compendium, BAKERpedia, Federation of Bakers and first-party spec sheets for IREKS Ciabatta Mix, Zeelandia Gamma GP, Zeelandia Optimax Free and Aromaferm Wheat & Malt Ferment 110.

 Side-by-side flow diagrams of four industrial bread mixing methods: straight dough, sponge-and-dough, Chorleywood (CBP), and activated dough development (ADD), each showing stages and approximate timings
1. Why the mixing method matters
Every bread recipe contains the same core ingredients — flour, water, yeast and salt — but bakers in different settings, using different equipment and serving different markets, arrive at very different end products from the same starting point. The difference is largely the mixing method: the sequence, duration, and mechanical intensity of the steps that transform those raw materials into developed dough.
Mixing is where four separate phenomena happen simultaneously:
- Hydration — flour proteins absorb water and begin to associate.
- Gluten formation — gliadin and glutenin proteins unfold and link through hydrogen bonds and disulphide bonds to form the elastic gluten network.
- Aeration — air is incorporated into the dough and subdivided into small bubbles by the mechanical action of the mixer; these bubbles become the nuclei of the gas cells that expand during proofing and baking.
- Distribution — yeast, salt, fat and improver ingredients are evenly dispersed throughout the dough mass.
The mixing method determines how much mechanical energy is used to achieve these four goals, and what chemical or biological assistance (fermentation time, improver ingredients) compensates for what the mixer does not do on its own. Get the balance wrong, and you have dense bread, poor flavour, premature staling, or — on a production line — inconsistent loaves that reject at quality control.
2. Gluten development science in brief
 Line graph showing dough resistance over mixing time with four labelled phases: Incorporation (rising line), Development (steep rise), Optimal (plateau at peak), Over-mixed (falling line). A small dough cross-section sketch accompanies each phase.
Understanding the four stages of gluten development gives you the framework to diagnose mixing problems regardless of which method you use.
Stage 1 — Incorporation: Flour and water combine. The mass looks rough and shaggy. Proteins are absorbing water but have not yet aligned or formed bonds. Resistance to the mixer is low.
Stage 2 — Development: The dough smooths out and begins to pull away from the bowl walls. Gluten proteins align and crosslink — both the weak bonds (hydrogen bonds, which form quickly) and the stronger disulphide (S–S) covalent bonds (which require more time and energy). Resistance increases.
Stage 3 — Optimal: The dough is smooth, slightly tacky, elastic and extensible. It passes the windowpane test (a small piece can be stretched thin enough to be translucent without tearing). Gas-bubble nuclei are maximised. This is the target state for most bread doughs.
Stage 4 — Over-mixing: With continued mixing the gluten network begins to break down. The dough becomes sticky, slack and weak. Gas retention deteriorates. Over-mixed dough cannot be recovered by rest or re-mixing.
Key implication: A method that develops dough quickly and mechanically (CBP) must not over-mix and must not rely on post-mix fermentation time to finish the job. A method that uses long fermentation instead of intensive mixing (straight dough, sponge-and-dough) completes part of gluten development enzymatically during the bulk rest period, so mixing can be shorter.
3. Method 1: Straight dough
The straight dough method combines all ingredients — flour, water, yeast, salt, fat and improver — in a single mixing stage. There are no pre-ferments, no two-stage processes.
How it works
-
Mix: All ingredients are combined and mixed until full gluten development (smooth, elastic dough). On a spiral mixer, this typically means 4–6 minutes at slow speed (incorporation) followed by 4–8 minutes at fast speed (development). Exact time depends on mixer type, bowl loading, dough temperature and hydration.
-
Bulk fermentation: The dough rests in bulk — typically 1–3 hours at 26–28°C — while yeast produces CO2, ethanol and flavour compounds. During this time enzymatic protease activity also slowly relaxes the gluten slightly, aiding extensibility and final proof volume.
-
Divide → Round → Intermediate proof → Mould: Each dough piece is scaled and rounded, rested for 10–15 minutes (intermediate or "first" proof) to relax before final shaping.
-
Final proof: Shaped pieces prove at 35–40°C / ~85% RH until approximately 80–90% of final baked volume.
-
Bake: Pieces enter the oven. Oven spring (rapid expansion in the first 5–10 minutes) completes gas cell inflation before crust sets.
Characteristics and when to use it
The straight dough method is the most straightforward approach — fewer steps, less equipment, and a single mixing operation to manage. It is suited to:
- Artisan and craft bakeries producing small to medium batches
- High-hydration speciality breads (ciabatta, focaccia, pizza) where long bulk fermentation builds flavour alongside structure
- Rye and wheat-rye breads (where a different set of rules apply — see Section 7)
- Any bakery wanting flexibility: the fermentation time can be adjusted day-to-day to suit production schedule
The main limitation is flour sensitivity: straight dough has less buffer against flour variability than CBP or sponge-and-dough. If the flour's protein level or enzyme activity changes between deliveries, the bread quality changes with it. Adding a bread improver significantly reduces this sensitivity.
Straight dough in practice — the ciabatta example
The IREKS Ciabatta Mix demonstrates straight dough in a high-hydration application:
- Recipe: 5.000 kg Ciabatta Mix + 0.100 kg fresh yeast + 0.075 kg olive oil + 3.500 kg water
- Mixing: spiral mixer, 5 min slow + 7 min fast
- Target dough temperature: 28°C
- Bulk fermentation: 60–90 min
- Final proof: 30–40 min
- Bake: 225–230°C, 25 min, full steam
At approximately 70% hydration (water relative to mix weight), ciabatta dough is too soft to shape conventionally — it is folded, not moulded, and handled with minimal mechanical intervention after bulk fermentation. The long bulk fermentation develops flavour and builds extensibility from enzymatic activity.
Focaccia variant: The same Ciabatta Mix recipe with water reduced to 65%, bulk fermentation shortened to 30 minutes, and the shaped dough proved in oiled hoops with an olive oil and rock salt topping. Different hydration and rest time give a completely different product character from the same base mix.
4. Method 2: Sponge-and-dough
The sponge-and-dough method uses a pre-ferment (the sponge) as a first stage before the final dough is assembled. It is the oldest of the four methods described here and was the dominant approach in British plant bakeries before the Chorleywood Process arrived.
How it works
- Build the sponge: A portion of the total flour — typically 50–70% — is mixed with most or all of the yeast and enough water to form a stiff-to-medium dough. It is mixed briefly (2–3 minutes, just enough to hydrate) and left to ferment.
- Ferment the sponge: The sponge ferments at approximately 23–26°C for 3–6 hours, or overnight at approximately 18–20°C for more complex flavour. During this time the sponge rises, reaches its peak (dome), and may begin to recede. Yeast multiplies; organic acids accumulate; the gluten in the sponge partially develops through enzymatic protease activity.
- Final mix: The mature sponge is added to the remaining ingredients (the balance of flour, salt, fat, remaining water, improver if used) and mixed to full development.
- Short floor time, then proceed as straight dough: Because the sponge has done much of the fermentation work, only a short floor time (15–20 minutes) is needed before dividing. The rest of the process — divide, round, intermediate proof, mould, final proof, bake — is the same as straight dough.
Why use sponge-and-dough?
Two bowls side by side: left shows a freshly mixed sponge, right shows the same sponge after 4 hours of fermentation at 26°C, demonstrating characteristic dome and bubble structure
Flavour: Longer fermentation of the sponge produces a richer palette of flavour compounds — ethanol, organic acids (lactic and acetic), esters and carbonyl compounds — compared to the shorter fermentation in a straight dough process.
Dough tolerance: The sponge's organic acids slightly lower the pH of the final dough, which tightens gluten slightly and improves its stability in the prover. The baker gets a wider window between ideal and over-proof.
Flour flexibility: The long sponge fermentation allows weaker flours to develop more fully. A straight dough of the same flour might produce an under-developed crumb; the sponge gives the gluten time to mature.
Better keeping: Lower pH, more organic acids, and more complex crumb structure from the long fermentation all contribute to modest improvements in mould resistance and perceived freshness over the following 24–48 hours compared to CBP bread.
The scheduling tradeoff
Sponge-and-dough is demanding to schedule. The sponge must ferment for 3–6 hours and be used at its peak. This means either building the sponge the previous evening (overnight ferment) or starting production many hours before the first bake. For bakeries with limited fermentation vessel space, sponge management can become a bottleneck.
Adding a ready-to-use dried sourdough to shortcut the sponge
For bakeries that want the flavour contribution of a pre-ferment without the scheduling burden, dried fermented wheat products like Aromaferm Wheat & Malt Ferment 110 offer a practical alternative.
Aromaferm is:
- A dried wheat sourdough (90–100% wheat malt + 5–10% wheat milling products, fermented and spray-dried)
- Used at 1–5% on flour weight — lower for background malty-acidic notes, higher for a pronounced fermentation character
- pH approximately 3.3 and Total Titratable Acidity 110 ± 10%
- Declared on label as "Dried Wheat Sourdough" — transparent and consumer-friendly
- Suitable for vegetarian, vegan, Kosher and Halal applications
Allergen and certification: Aromaferm is a wheat-based product (90–100% wheat malt), making wheat a declared major allergen in any end product under UK FIR 2014 and EU Regulation (EC) 1169/2011 Annex II. The vegetarian, vegan, Kosher and Halal suitability claims above are from a 2018 product specification. Certification status must be verified with a current certificate from the supplier (AB Mauri) before these claims are used in any product marketing or labelling.
When added to a straight dough, Aromaferm introduces the acidic and aromatic character of a mature pre-ferment without requiring a separate fermentation vessel or hours of scheduling. It does not replace the structural changes in gluten that a live sponge provides, but it delivers the flavour profile that makes sponge-and-dough bread distinctive. See the formula card below.
5. Method 3: Chorleywood Bread Process (CBP)
The Chorleywood Bread Process is the most significant technical development in commercial bread production in the twentieth century, and it dominates large-scale industrial bread production in the UK.
Origins
CBP was developed in 1961 at the British Baking Industries Research Association (BBIRA) in Chorleywood, UK — the organisation that became Campden BRI. Its inventors observed that if sufficient mechanical energy was input to dough in a very short time, full gluten development could be achieved in minutes rather than hours, eliminating the need for bulk fermentation.
The science of intensive mechanical development
Where straight dough development relies on energy over time (mechanical + enzymatic), CBP relies on energy input per unit time: very high power in a very short period.
The typical CBP energy input is approximately 11–13 Wh/kg (approximately 40–47 kJ/kg) of dough. This is achieved in 3–5 minutes using twin-rotor or high-speed intensive mixers that run at speeds far higher than conventional spiral mixers. The intense mechanical action:
- Forces water into the protein matrix at a rate faster than passive absorption
- Aligns gluten proteins and forms disulphide bonds much more rapidly
- Subdivides air into very fine, uniform bubbles — producing CBP's characteristic fine, uniform crumb
What CBP requires in the formula
CBP cannot work with flour, water, yeast and salt alone. Two additives are mandatory:
Ascorbic acid (E300): Approximately 50–75 ppm on flour weight — though this figure is single-source and actual levels vary by flour. Ascorbic acid is converted in wet dough to dehydroascorbic acid (DHAA), which rapidly oxidises gluten SH groups, forming S–S crosslinks that strengthen the gluten network during the intense mixing phase. Without this oxidant, the intensive mixing would produce a dough that is mechanically developed but structurally weak.
Fat: Typically 0.7–1% on flour weight. Fat promotes fine gas bubble dispersion and improves crumb softness. In the absence of bulk fermentation, fat also plays a larger role in crumb tenderness than it would in a sponge-and-dough system.
Higher yeast: Because there is no bulk fermentation to develop CO2 progressively, CBP dough uses more yeast (typically 2.5–3% fresh yeast ) to compensate.
No bulk fermentation
After intensive mixing, CBP dough proceeds almost immediately to the divider — with only a very short "floor time" of approximately 5–10 minutes before dividing. There is no bulk fermentation phase. This is what makes CBP so time-efficient compared to straight dough or sponge-and-dough.
Advantages and trade-offs
| Advantage | Trade-off |
|---|---|
| Entire process from mixing to oven in approximately 3–4 hours | Requires capital investment in intensive mixing equipment |
| Can use lower-protein UK wheat varieties not suitable for traditional methods | Bread has less fermentation flavour than sponge-and-dough |
| Very consistent, uniform crumb suitable for sliced packaged bread | Fine, closed crumb perceived as inferior by artisan bakers |
| Accounts for the majority of UK plant bread production | Mandatory ascorbic acid and fat raise formulation cost vs basic straight dough |
| Works well with high-volume automated dividing and moulding lines | Anti-staling systems essential — CBP bread stales at similar rate to straight dough without maltogenic amylase and emulsifiers |
CBP and flour variety selection
One often-overlooked advantage of CBP is that it enables use of Group 2 and some Group 3 UK wheat varieties — wheats with moderate or lower protein that would not develop adequately in a straight dough or sponge system. The mechanical energy compensates for what the protein cannot provide. This has significantly influenced the economics of UK wheat production since 1961, because farmers can grow higher-yielding lower-protein varieties and still sell into the bread market.
6. Method 4: Activated Dough Development (ADD)
Activated Dough Development is a chemical-assist method designed to achieve good gluten development in standard mixers without the capital cost of intensive CBP equipment and without the long bulk fermentation of straight dough or sponge-and-dough.
The method uses a two-part chemistry: first weaken the gluten, then re-strengthen it.
How ADD works
Step 1 — Reduction (weakening): L-cysteine (E920) — or glutathione from inactive (autolysed) yeast as a clean-label alternative — is added to the dough. L-cysteine cleaves disulphide bonds in gluten proteins through thiol-disulphide exchange, making the gluten network more extensible and reducing its resistance to the mixer. This means less mechanical energy is needed to develop the dough.
Step 2 — Re-oxidation (re-strengthening): Ascorbic acid (E300) is added simultaneously. As the dough is mixed (briefly, typically 3–5 minutes in a standard mixer), the ascorbic acid is converted to dehydroascorbic acid and re-forms S–S crosslinks in the relaxed gluten, rebuilding network strength to the target level.
The result is a dough that is fully developed in a short time with standard equipment — mechanically equivalent (though not organoleptically equivalent) to CBP output.
Where ADD fits in practice
ADD occupies the middle ground:
- Above straight dough: less time, less fermentation needed
- Below CBP: less equipment investment, lower throughput
It is particularly suitable for:
- Medium-scale plant bakeries with conventional spiral mixers that cannot justify CBP intensive mixer investment
- Pizza and flatbread production where the L-cysteine relaxation is a direct benefit (extensible, easy-to-sheet dough) rather than a step on the way to a re-strengthened loaf
- High-protein flours where gluten is naturally very strong and needs softening to achieve adequate extensibility for moulding
ADD: labelling and sourcing considerations
Allergen/dietary claim: L-cysteine (E920) can be derived from animal hair or feathers. Synthetic or fermentation-derived L-cysteine is available from some suppliers. Before declaring an ADD bread as Halal, Kosher or vegan, verify the source of E920 used in the improver or added directly to the dough.
Inactive yeast (as a glutathione source) avoids this issue entirely — it must be declared on the ingredient label as "yeast extract" or "inactive yeast" but carries no Halal/vegan complication.
7. Comparing all four methods
See the detailed comparison table below. The following is a summary of the key differentiators:
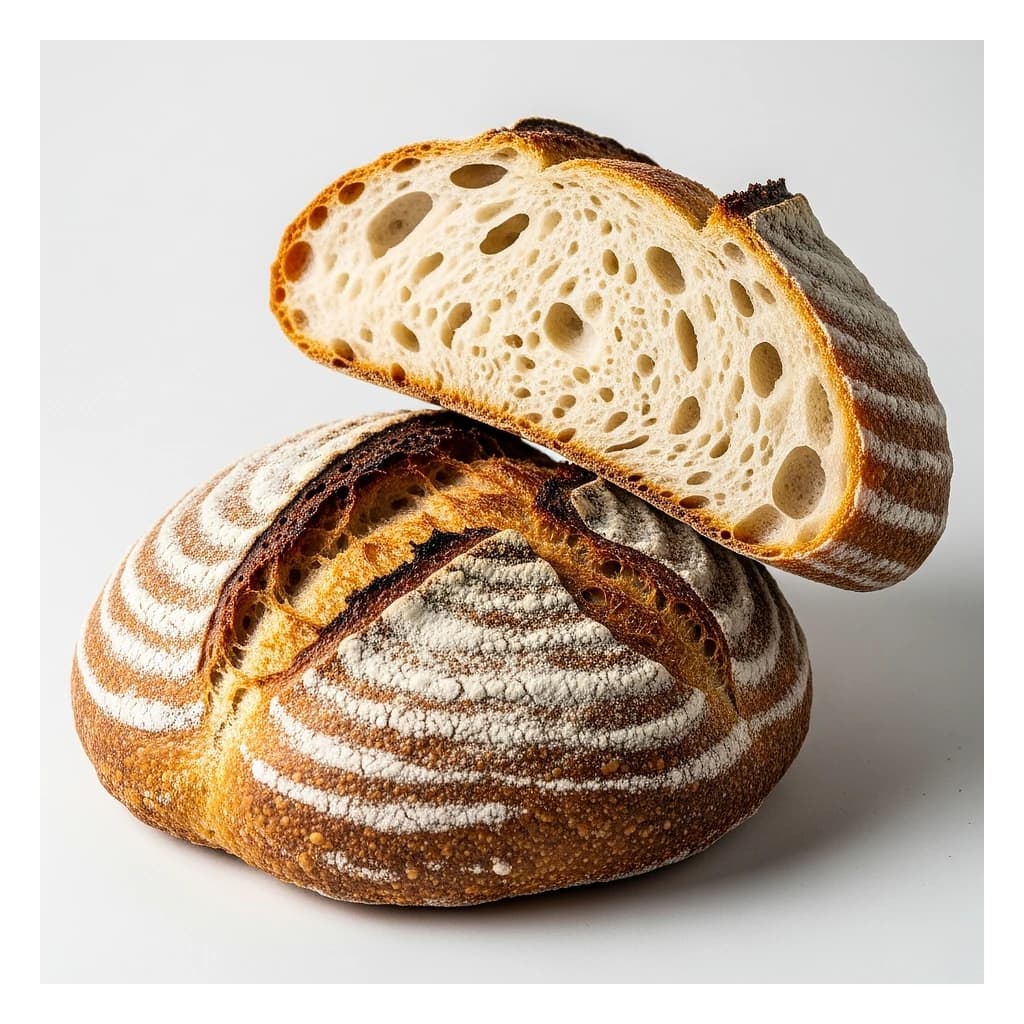
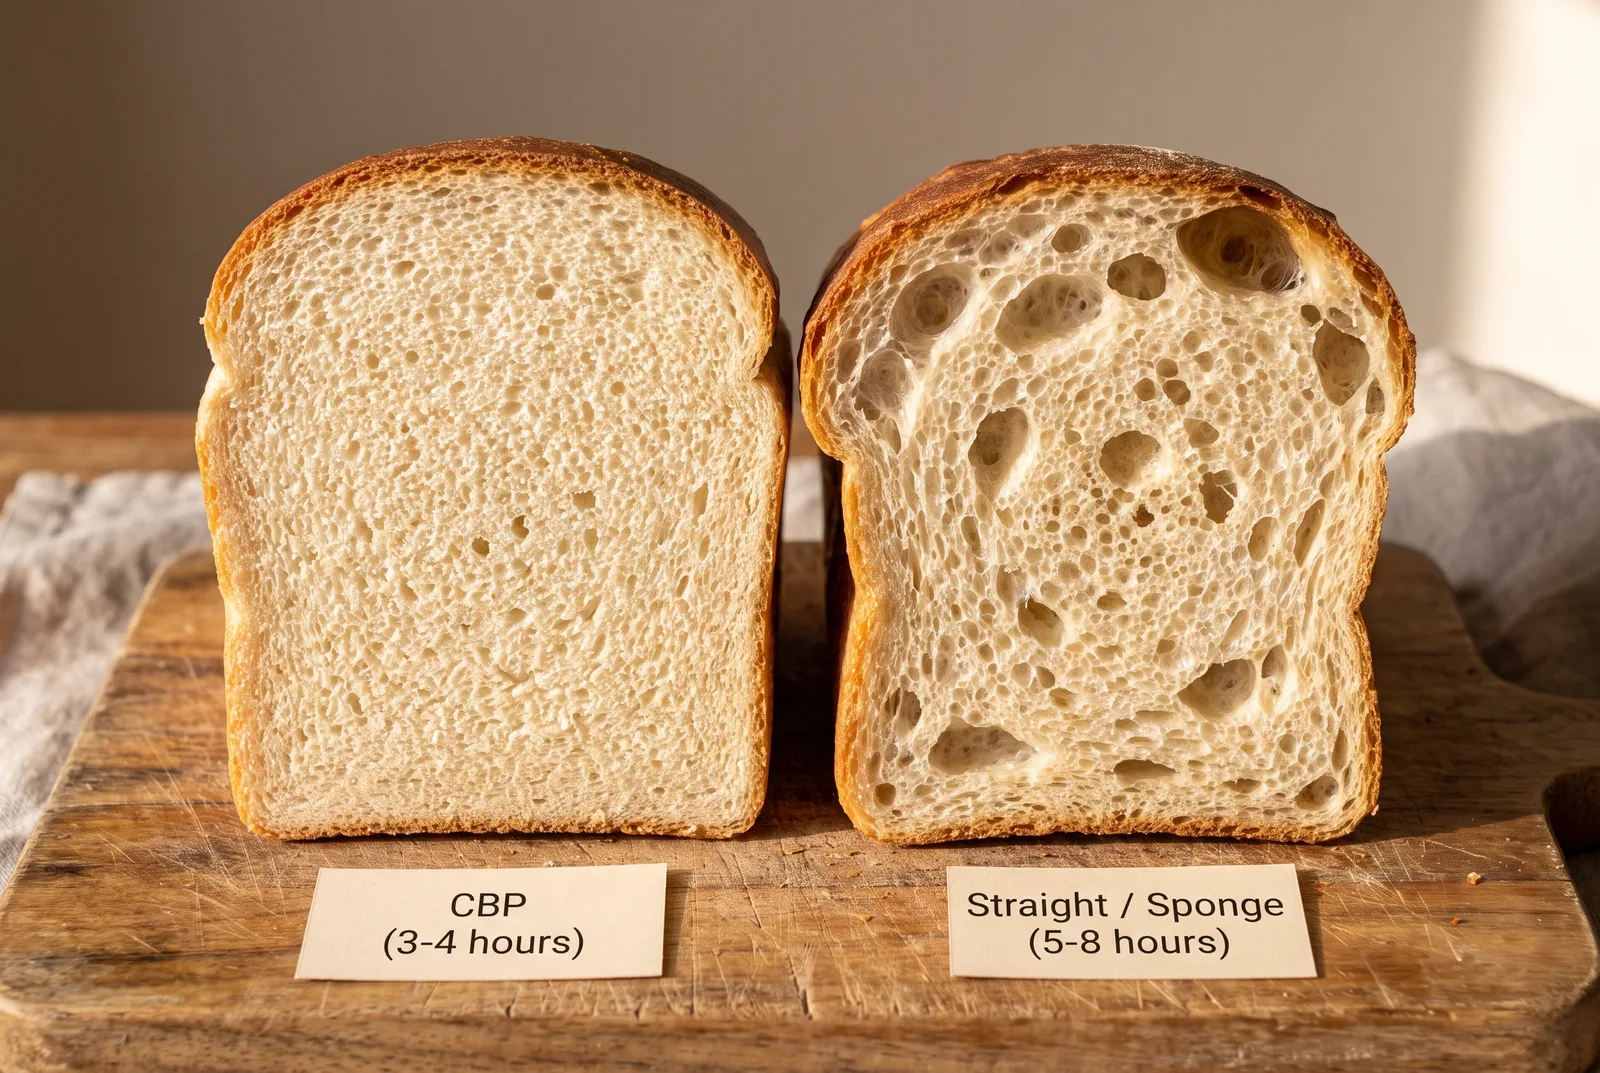 Two sliced loaves side by side: left shows a fine, uniform crumb typical of Chorleywood Process white bread; right shows an open, irregular crumb with larger holes typical of slow-fermented artisan bread
| Criterion | Straight Dough | Sponge-and-Dough | CBP | ADD |
|---|---|---|---|---|
| Equipment required | Standard mixer | Standard mixer + vessels | Intensive mixer | Standard mixer |
| Total time | 3–5 h | 5–8 h | 3–4 h | 3–4 h |
| Flavour complexity | Moderate | Highest | Lowest | Low |
| Crumb uniformity | Moderate | Moderate | Highest | High |
| Flour flexibility | Low–moderate | Moderate | High (lower protein viable) | Moderate |
| Anti-staling systems needed | Optional | Optional | Essential | Essential |
| Mandatory additives | None (improvers optional) | None | Ascorbic acid + fat | L-cysteine + ascorbic acid + fat |
8. Bread improvers across all four methods
The role and optimal formulation of a bread improver differs significantly depending on the mixing method. The comparison table below provides full detail. The key principles:
Straight dough: buffer against flour variability
A standard general-purpose improver such as Zeelandia Gamma GP provides:
- Ascorbic acid (E300) to strengthen gluten during mixing
- A wheat-derived enzyme to improve extensibility and volume
- Rapeseed oil to aid gas bubble stability
The Gamma GP is dosed at 0.5–0.75% on flour for white tin bread, rising to 1% for bloomers, 1.5% for soft rolls and 2% for crusty rolls and wholemeal. The higher dose for wholemeal and crusty products reflects their greater need for gluten support — bran particles cut through the gluten network, requiring more oxidant and enzyme activity to compensate.
Allergen cross-contamination declaration: The February 2020 Gamma GP specification lists egg and sesame among cross-contamination allergens. Current product listings accessed June 2026 show a different allergen set (cereals containing gluten, soya, milk; may contain lupin) and do not list egg or sesame. This discrepancy must be resolved with Zeelandia using a current specification before Gamma GP is included in any product with allergen declarations or free-from claims.
Sponge-and-dough: lighter improver touch
In a well-managed sponge-and-dough system, the fermentation itself provides some gluten development and flavour. The improver can therefore be lighter — lower in oxidant, focused more on emulsifiers for crumb softness and shelf life than on structural support.
CBP: improver is central to the process
CBP is essentially built around a bread improver. The ascorbic acid that is mandatory for CBP is almost always delivered via a commercial improver formulated for intensive mixing. Additional elements — fat (for gas stability), DATEM E472e (for dough tolerance), maltogenic amylase (for anti-staling) — are typically also included.
For rye and mixed-grain breads where emulsifier-free labelling is important, a product like Zeelandia Optimax Free provides the structural support through vital wheat gluten (50%) as its base, plus ascorbic acid and enzyme, with no emulsifiers. Its mixing protocol — 8 minutes slow + 2 minutes high speed, dough temperature 28°C, first proof 15 minutes — is a textbook straight-dough approach for rye-dominant formulas.
ADD: the improver IS the method
In ADD the improver is not supplementary — it defines the process. The L-cysteine (or inactive yeast) and ascorbic acid that characterise ADD are always delivered as part of a purpose-formulated improver blend. The baker is buying both a processing aid and a method.
9. Critical process parameters
The following parameters apply across all four methods. See the table below for full detail with sources.
Desired Dough Temperature (DDT)
Target: 26–28°C
Dough temperature governs fermentation speed more than any other single parameter. A dough at 24°C will ferment significantly more slowly than one at 28°C. In the bakery, DDT is controlled by adjusting the temperature of the mixing water. The formula to calculate required water temperature is:
Water temp (°C) = (DDT × 3) − flour temp − room temp − friction factor
where friction factor (heat generated by mixing) is typically 4–10°C for standard spiral mixers and higher for intensive CBP mixers.
Proofing conditions
Final proof: 35–40°C / approximately 85% RH
Exceeding 40°C risks killing yeast cells near the surface and producing off-flavours through rapid fermentation. Below 35°C slows production significantly. The 85% RH target prevents surface skinning, which would restrict oven spring; excessive humidity leads to condensation and a sticky, wet surface.
Steam in the oven
Steam for approximately the first 5–8 minutes of baking, then vented.
Steam delays crust formation, allowing the full oven spring (dough expansion from CO2 and steam expansion inside the dough) to complete before the crust sets. Venting steam after the initial phase allows the crust to dehydrate, colour through the Maillard reaction, and develop the characteristic crunch of a well-baked crust.
Internal temperature
Target core temperature: 93–99°C for lean and crusty bread types (baguettes, sourdough, tin bread). Enriched doughs (sandwich loaves, soft rolls — containing milk, sugar or elevated fat) are typically done at 88–93°C. Below these thresholds, starch may not be fully gelatinised throughout the crumb, resulting in a doughy, sticky internal texture that collapses on cutting. These are quality best-practice targets, not statutory minimums — no EU or UK regulation specifies a minimum internal baking temperature for bread.
Starch gelatinisation
Occurs over approximately 56–85°C. The process is:
- Starch granules absorb water and swell (onset ~ 56°C).
- Granule structure disrupts and starch chains become mobile (complete ~ 85°C).
- On cooling, chains begin to re-associate — this is the start of staling.
10. Staling: why it happens and how method affects it
Staling is primarily caused by starch retrogradation: the re-crystallisation of amylose and amylopectin chains after baking. Freshly baked bread has gelatinised, amorphous starch; over the following hours and days the chains progressively re-order into a stiffer, more crystalline structure, producing a firmer, crumblier crumb.
The refrigerator trap
Staling is fastest near 4°C — refrigeration temperature. At this temperature, the rearrangement of starch chains is maximised. Bread stored at room temperature stales more slowly; frozen bread (at −18°C) stales very slowly because molecular mobility is low, but rapid staling resumes on thawing. This is why bakeries use room temperature or freezing for bread storage, never refrigeration.
See the staling graph below for a visual representation.
How mixing method affects staling rate
Sponge-and-dough bread, with its higher organic acid content from longer fermentation, has modestly better staling resistance than equivalent CBP bread — the lower pH and more complex crumb structure both contribute.
CBP bread and ADD bread require dedicated anti-staling systems because they lack the fermentation benefit:
- Maltogenic amylase — modifies amylopectin chains during baking so they re-crystallise more slowly. This is the most effective anti-staling enzyme in current use.
- Mono- and diglycerides (MDG / E471) — complex with amylose chains during gelatinisation, physically blocking retrogradation.
For artisan straight dough bread with a 2+ hour bulk fermentation, the anti-staling enzyme is optional rather than essential, though it remains beneficial for packaged product.
11. Common faults by mixing method
See the full fault table below. Below are the most practically important issues for each method:
Straight dough:
- Dense crumb / low volume: Under-mixing (check mixing time and DDT) or under-fermentation (bulk too short or dough too cold).
- Large irregular holes: Over-fermentation in bulk or too long a floor time after dividing. Divide at a more consistent pace and reduce bulk time.
Sponge-and-dough:
- Sponge too acidic / bread collapses: Sponge was past peak when used. Reduce sponge fermentation time, or drop sponge temperature slightly.
- Weak, sticky final dough: Over-fermented sponge has released excessive protease activity. Use sponge at or before its dome peak.
CBP:
- Pallid, bland flavour: Inherent to the method. Mitigate with dried sourdough (Aromaferm) or fermented wheat flour.
- Rapid staling without anti-staling improver: Essential to include maltogenic amylase and/or MDG in the formula.
ADD:
- Slack, spreading dough: L-cysteine overdose or inactive yeast overdose. Reduce reductant level and check formula against supplier technical data.
- Tight, tearing dough during moulding: Insufficient reductant dose; ascorbic acid level too high relative to L-cysteine. Rebalance.
12. Method selection guide
Choose straight dough when:
- You have a spiral mixer and want a simple, one-stage process
- You are producing artisan or speciality bread where fermentation flavour matters
- You produce rye, ciabatta, baguette or other products where long bulk fermentation is part of the recipe character
- Batch size is small to medium
Choose sponge-and-dough when:
- Flavour complexity is a priority and you can accommodate the 5–8 hour schedule
- You are producing white tin bread, sandwich loaves or bloomers at medium scale
- Your flour protein is moderate and you want to compensate with fermentation time
Choose CBP when:
- You are operating at large plant scale with high throughput targets
- Capital investment in intensive mixing equipment is justified by volume
- Consistent, fine crumb for sliced packaged bread is the target
- Your flour supply includes lower-protein UK varieties
Choose ADD when:
- You need CBP-like speed and consistency but do not have or cannot justify intensive mixing equipment
- You produce pizza, flatbreads or sheeted products where dough extensibility is a premium requirement
- You want a shorter total process than straight dough without investing in a CBP line
Coverage notes and gaps
This article is solid on:
- The four principal UK industrial methods, their operating principles and comparisons (two or more corroborating sources for all main claims)
- Process parameters: dough temperature, proofing conditions, baking temperatures (high confidence — confirmed by spec sheets and reference sources)
- First-party spec data from IREKS Ciabatta Mix (straight dough example), Zeelandia Gamma GP (general improver dosages), Zeelandia Optimax Free (rye/mix straight dough application), and Aromaferm Wheat & Malt Ferment 110 (dried sourdough addition)
- Staling mechanism and the refrigeration trap (Modernist Cuisine + accepted food science)
This article is thin on:
- CBP energy input (11 Wh/kg): one source only. A visit to Campden BRI documentation or BBIRA original papers would confirm or correct this figure.
- CBP market share: the widely cited "80% of UK plant bread" figure could not be directly attributed to a primary or trade body source during this research. The article states "majority" rather than a percentage.
- CBP ascorbic acid dosage (50–75 ppm): one source only. Supplier technical sheets for CBP-specific improvers would confirm.
- Retarded fermentation (overnight retard) is only briefly mentioned — a dedicated article in A5 on cold and retarded dough processes would complement this one.
- No coverage of the No-Time Dough (NTD) method, which uses chemical oxidants without the L-cysteine component — a minor variant but used in some bakeries.
- Sponge-and-dough flour split percentages (50–70%) are from a single FOB source.
Figures
 Line graph of bread crumb firmness over 7 days. Three lines: Room temperature (moderate rise), Refrigerated 4°C (steep fast rise — most firm), Frozen then thawed (flat then rises sharply after thaw). Axes labelled: X = Days after baking, Y = Crumb firmness (arbitrary units). Title: Staling Rate by Storage Temperature.
High-Hydration Straight Dough — IREKS Ciabatta
Recipe from IREKS Ciabatta Mix spec sheet (brochure). Demonstrates straight dough method with high hydration (approximately 70% on mix weight). All quantities in baker's percentage relative to the 5 kg ciabatta mix base.
| Ingredient | Baker's % | Weight |
|---|---|---|
| IREKS Ciabatta Mix | 100% | 5.000 kg |
| Fresh yeast | 2% | 0.100 kg |
| Olive oil | 1.5% | 0.075 kg |
| Water | 70% | 3.500 kg |
- STRAIGHT DOUGH METHOD. Spiral mixer: 5 min slow (incorporation) + 7 min fast (development). Target dough temperature 28°C. Bulk fermentation: 60–90 min at room temperature. Divide and gently shape — ciabatta is not moulded tightly. Final proof: 30–40 min. Bake: 225–230°C for approximately 25 min with FULL steam throughout.
Yield: Total dough weight 8.675 kg. Individual ciabattas typically 350–500 g dough weight. Focaccia variant: reduce water to 65%, bulk ferment 30 min only, prove in oiled hoops, decorate with olive oil and rock salt.
Straight Dough Rye-Mix Bread with Zeelandia Optimax Free (Emulsifier-Free Improver)
Application recipe from Zeelandia Optimax Free spec sheet. A straight dough method for a mixed rye bread (wheat+rye) with added rye sourdough for flavour and acidity. Baker's percentage calculated on total flour base (wheat T850 + rye T720 = 6 kg).
| Ingredient | Baker's % | Weight |
|---|---|---|
| Wheat flour type T850 | 16.7% | 1.00 kg |
| Rye flour type T720 | 83.3% | 5.00 kg |
| Rye sourdough (liquid) | n/a (supplied) | 6.40 kg |
| Salt | 3.8% | 0.23 kg |
| Fresh yeast | 4.2% | 0.25 kg |
| Optimax Free bread improver | ~1.7% | 0.10 kg |
| Water | ~93% | 5.60 kg |
- STRAIGHT DOUGH METHOD. Mix all ingredients: 8 min low speed + 2 min high speed. Target dough temperature approximately 28°C. First proof (floor time): approximately 15 min. Place directly into baking forms (0.58 kg pieces). Final proof in tins: approximately 50 min. Bake at 250°C reducing to 230°C, with steam for first 5 minutes. Total baking time approximately 45 min.
Yield: Dough pieces 0.58 kg each in baking forms. High water content is normal for rye doughs — the dough is poured rather than shaped in the traditional sense.
Sponge-and-Dough Method — Principle Formula (Concept)
A conceptual template for the sponge-and-dough method applied to a standard white bread formula. Not derived from a specific spec sheet — based on industry standard practice described by Federation of Bakers and IREKS Compendium. Confidence: medium. A baker should adapt to their specific flour and mixer.
| Ingredient | Baker's % | Weight |
|---|---|---|
| Sponge — Strong wheat flour | 60% of total flour | |
| Sponge — Fresh yeast | 1.5–2% on total flour (all in sponge) | |
| Sponge — Water | 55–60% on sponge flour | |
| Final dough — Remaining wheat flour | 40% of total flour | |
| Final dough — Salt | 2% on total flour | |
| Final dough — Fat (optional) | 1–2% on total flour | |
| Final dough — Bread improver (optional) | 0.5–1% on total flour | |
| Final dough — Water (to adjust final hydration) | as needed to reach 62–65% total hydration |
- SPONGE-AND-DOUGH METHOD. Stage 1 — Sponge: Mix briefly (2–3 min slow) until hydrated. Ferment at 26–28°C for 3–6 hours until sponge has doubled and dome begins to recede. Stage 2 — Final mix: Add sponge to remaining ingredients. Mix until full gluten development (standard mixing programme). Short floor time 15–20 min. Divide, round, intermediate proof 10 min, mould, final proof 40–50 min at 38°C / 85% RH. Bake 220°C for 25–30 min.
Yield: Sponge fermentation time controls flavour depth: 3 hours = mild; 5–6 hours = more pronounced tang. Overnight sponge at 18°C produces most complex flavour.
Adding Dried Sourdough (Aromaferm) to Straight Dough for Enhanced Flavour
Demonstrates how a dried wheat sourdough such as Aromaferm Wheat & Malt Ferment 110 can add pre-ferment flavour to a straight dough without the scheduling complexity of a sponge method. Data from spec sheet.
| Ingredient | Baker's % | Weight |
|---|---|---|
| Strong wheat flour | 100% | |
| Aromaferm Wheat & Malt Ferment 110 (dried wheat sourdough) | 1–5% (on flour weight) | |
| Fresh yeast | 1.5–2% | |
| Salt | 2% | |
| Water | 62–66% | |
| Bread improver | 0.5–1% |
- Add Aromaferm with dry ingredients. Proceed as standard straight dough. The product supplies acidity (pH ~3.3, TTA 110 ±10%) and aromatic malt fermentation character that complements but does not replace bulk fermentation flavour. Suitable for bakeries seeking clean-label fermented wheat flavour without maintaining a live sponge. Vegan, Kosher, Halal certified.
Yield: Higher Aromaferm dose (3–5%) = stronger acidic note. Lower dose (1–2%) = subtle malt-wheat flavour background. Adjust yeast level if acidity inhibits early fermentation.
Each row covers one method as practised in commercial bakeries. Figures are typical ranges; actual values depend on recipe, flour quality and equipment. Source reliability varies — see claims_supported notes. Single-source figures are marked *single-source*. Quality note: yeast dosages and ascorbic acid levels should be validated against supplier technical data for specific flours and equipment.
| Parameter | Straight Dough | Sponge-and-Dough | Chorleywood (CBP) | Activated Dough Development (ADD) |
|---|---|---|---|---|
| When developed / origins | Traditional; used for centuries in craft and plant bakeries | Traditional UK plant bakery method; common before CBP | Invented 1961 at British Baking Industries Research Association (BBIRA), Chorleywood | Developed as a mid-energy alternative to CBP for bakeries without intensive mixers |
| Process stages | Mix → Bulk ferment → Divide → Round → Intermediate proof → Mould → Final proof → Bake | Mix sponge → Sponge ferment → Add remaining ingredients → Final mix → Divide → Mould → Final proof → Bake | Intensive mix (no bulk ferment) → Floor time (short) → Divide → Mould → Final proof → Bake | Short mix → Short floor time → Divide → Mould → Final proof → Bake |
| Mixing energy | Standard (conventional spiral or planetary) — approx 4–6 min slow + 4–6 min fast (equipment- and recipe-dependent) | Sponge: low energy (brief mix). Final dough: standard mix for full development | Intensive: approx 11–13 Wh/kg (approx 40–47 kJ/kg) of dough (corroborated across trade references). Requires twin-rotor or high-speed intensive mixer | Low: short mix (approx 3–5 min total) in standard mixer — mechanical energy reduced by L-cysteine relaxation |
| Bulk / floor fermentation | Typically 1–3 hours at 26–28°C | Sponge ferment: 3–6 hours (or overnight at 18–20°C). Final dough: minimal, 15–20 min floor time | No bulk fermentation. Very short floor time of approximately 5–10 min before dividing | No bulk fermentation, or very short floor time (10–15 min) |
| Total process time (mix to oven) | Approx 3–5 hours depending on fermentation time | Approx 5–8 hours (longer when sponge ferments overnight) | Approx 3–4 hours (single source) | Approx 3–4 hours (similar to CBP in total, but different time distribution) |
| Flour protein requirement | Moderate–strong: min 11–12% protein for good volume (varies by product) | Moderate–strong: long sponge ferment partly compensates for moderate protein | Can use lower-protein UK wheat varieties (Group 2 and some Group 3) not suitable for traditional methods. Gluten development by mechanical energy, not time. | Moderate–strong: L-cysteine compensates partly for high-protein toughness; requires ascorbic acid re-strengthening |
| Key additives required | None mandatory; improvers (ascorbic acid, emulsifiers, enzymes) recommended for consistency | None mandatory; improvers may be added to final dough to boost volume and tolerance | MANDATORY: ascorbic acid (E300) — approx 50–75 ppm (single source). Fat (typically ~0.7–1% on flour). Higher yeast than straight dough. | MANDATORY: L-cysteine (E920) or glutathione (from inactive yeast) as reductant. Ascorbic acid (E300) as re-oxidant. Fat similar to CBP. |
| Yeast level (fresh yeast) | Typically 1.5–2.5% on flour for normal bulk fermentation times | Yeast mostly added to sponge; total level similar to straight dough or slightly less (long ferment compensates) | Higher than straight dough — typically 2.5–3% (single source) because no bulk fermentation phase | Similar to CBP: elevated to compensate for absence of bulk fermentation |
| Flavour outcome | Moderate flavour: fermentation acids develop during bulk time. Longer bulk = more complex flavour. | Best flavour of the four: long sponge fermentation produces lactic and acetic acids, ethanol volatiles, and complex aromatics | Lighter flavour: no bulk fermentation, so fewer fermentation volatiles. Fat masks some flavour loss. Widely accepted commercially but perceived as blander by artisan bakers. | Similar to CBP in flavour profile: short process with chemical assistance, minimal fermentation character |
| Crumb structure | Moderate irregularity: hole size depends on fermentation time and hydration. Longer bulk = more open crumb. | Moderately open and uniform; fine crumb for sandwich bread, or more open for bloomers | Fine, uniform, closed crumb: mechanical development produces very consistent structure. Suitable for sliced packaged bread. | Fine to moderately uniform, similar to CBP |
| Scale and equipment suitability | All scales — from craft to large plant. Standard spiral or planetary mixers. | Larger craft to medium plant bakeries. Requires separate sponge fermentation vessels. | Large-scale plant bakeries. Requires dedicated high-energy intensive mixers (capital investment). | Medium plant bakeries. Standard mixers sufficient — the key advantage vs CBP. |
| Primary shelf life advantage | Moderate: longer fermentation acids provide some natural antimicrobial effect | Better than straight dough: more organic acids from long sponge ferment lower water activity slightly | Requires added anti-staling systems (maltogenic amylase, MDG E471) and preservatives (calcium propionate E282) to achieve commercial shelf life | Similar to CBP: chemical/enzyme anti-staling systems needed |
Parameters that apply to all four methods, with typical target ranges. Actual targets depend on recipe and equipment.
| Parameter | Typical Range / Target | Why It Matters |
|---|---|---|
| Desired Dough Temperature (DDT) | 26–28°C | Yeast activity approximately doubles for every 10°C rise up to ~35°C. Too cold = slow fermentation; too warm = risk of over-fermentation and structure weakening before shaping. |
| Final proof temperature | 35–40°C | Maximises yeast CO2 production before baking. Above 40°C risks killing yeast or producing off-flavours. Below 35°C slows final proof significantly. |
| Final proof relative humidity | Approximately 85% RH | Prevents skin formation on dough surface which would restrict oven spring. Too high = sticky condensation; too low = crust before baking. |
| Baking temperature (white bread) | 210–240°C (fan-assisted or deck oven) | Drives oven spring (first 5–10 min), sets gluten structure, gelatinises starch, initiates Maillard reaction for crust colour. |
| Starch gelatinisation temperature | Approximately 56–85°C | Starch must gelatinise for the crumb to set. Below this temperature the bread will collapse on cooling. |
| Internal core temperature at end of bake | 93–99°C (lean/crusty); 88–93°C (enriched/soft rolls) | Ensures full starch gelatinisation and protein coagulation. Lean breads (baguettes, tin loaves) require 93–99°C for full crumb set; enriched doughs (milk, sugar, fat) achieve texture completion at lower temperatures. These are quality best-practice targets, not statutory minima under UK or EU law. |
| Steam in oven | First 5–8 minutes of bake, then vented | Steam delays skin formation, allowing full oven spring. Removing steam later allows crust to dehydrate and colour properly. |
| Bulk fermentation temperature (straight dough) | 25–28°C | Controls fermentation speed and flavour development balance. Cooler = slower but more flavour; warmer = faster but less complex. |
| Retarded fermentation temperature | 3–8°C (overnight retard) | Slows yeast but allows enzymatic and flavour development. Common in artisan and hotel bakeries with same-day baking schedule. |
Guidance on why improver choice and dosage differ between mixing methods. Based on IREKS Compendium, BAKERpedia, and Zeelandia Gamma GP spec sheet.
| Method | Improver need | Key active ingredients | Dosage orientation |
|---|---|---|---|
| Straight dough | Moderate: flour variability buffer, dough tolerance improvement, volume consistency | Ascorbic acid (E300), enzyme (amylase, xylanase), DATEM E472e for dough tolerance | Low to medium: e.g. Gamma GP 0.5–1% for tin bread, 2% for wholemeal/crusty |
| Sponge-and-dough | Lower oxidant need: fermentation partly achieves gluten strengthening naturally. Emulsifiers for crumb softness still valuable. | Emulsifiers (E471 MDG) for anti-staling; lower ascorbic acid level than CBP | Improver added to final dough, not sponge. Reduced dose compared to straight dough. |
| Chorleywood (CBP) | Mandatory and highest: ascorbic acid essential for rapid gluten development; fat essential for gas retention; anti-staling system required | Ascorbic acid (E300) approx 50–75 ppm (single source), fat (0.7–1%), emulsifiers, maltogenic amylase (anti-staling) | Higher overall improver load than straight dough because of absent fermentation |
| ADD | High: L-cysteine (E920) plus ascorbic acid (E300) are the core of the method. Fat required. Anti-staling system as for CBP. | L-cysteine (E920) or glutathione (inactive yeast). Ascorbic acid (E300). Fat. Emulsifiers. | L-cysteine levels precisely controlled — too much relaxes gluten excessively; ascorbic acid restores strength |
Faults organised by the stage or parameter most likely responsible. Sources: IREKS Compendium, BAKERpedia, Federation of Bakers. Where a fault can arise from multiple causes, all relevant causes are listed. Always rule out flour quality, yeast activity and oven issues before assuming the mixing method is the cause.
| Fault / symptom | Likely cause | Method most affected | Remedy |
|---|---|---|---|
| Low volume; dense crumb; poor oven spring | Under-mixing: insufficient gluten development. Or under-fermentation (too little bulk time or cold dough). | Straight dough, Sponge | Extend mixing to full development (smooth, dry, elastic dough). Ensure dough temperature is 26–28°C. Check bulk fermentation time and temperature. |
| Very dense crumb, glassy crumb texture, wet feel | Rye bread or high-rye blend: rye pentosans hold water and prevent gluten network forming normally. Not a fault — expected unless inadequately acidified. | Straight dough (rye or rye-mix) | Add rye sourdough as per recipe. Add rye stabil improver or VWG-based product to provide structural protein. Ensure adequate acidity (pH 4.0–4.6 in finished rye bread). |
| Bread collapses in oven ('drops' after rise) | Over-proof: gluten structure exhausted before baking; can no longer support gas. Also possible if CBP dough sits too long before baking. | All methods | Reduce final proof time or temperature. For CBP: minimise floor time between divider and prover. Check yeast level — if excessive, fermentation races ahead. |
| Burst crust / 'blow-out' on the side | Under-proof: dough enters oven before gluten has relaxed enough, causing uncontrolled oven spring at the weakest crust point. Also: inadequate scoring on crusty breads. | All methods | Extend final proof time or proof at slightly lower temperature (more gentle). Score crusty breads with a razor or lame immediately before loading. |
| Large uneven holes in crumb; irregular open structure | In straight dough: over-fermentation producing excessive gas before shaping. In sponge-and-dough: sponge past peak when used. | Straight dough, Sponge | Reduce bulk fermentation time or temperature. Use sponge before dome fully recedes. Gentle dividing and shaping without degassing the dough too forcefully. |
| Sticky dough that tears on moulding; spreads in prover | Over-relaxation of gluten: excessive reductant (L-cysteine overdose in ADD), or excessive protease enzyme in improver, or very long fermentation with high enzyme activity. | ADD (L-cysteine overdose), Sponge (over-fermented sponge) | Reduce L-cysteine / reductant dose in ADD. For sponge: use sponge at or before peak; reduce sponge temperature. Verify flour quality and improver enzyme level. |
| Bland flavour despite adequate volume and crumb | Insufficient fermentation time (CBP, ADD); no added fermentation flavour carrier; low yeast quality; baking too slowly at low temperature (inhibits Maillard). | CBP, ADD | Add dried fermented wheat (e.g. Aromaferm 1–5% on flour) for fermentation character. Ensure oven temperature is adequate for Maillard browning. Consider longer final proof to develop modest flavour. For repeat issues in plant: evaluate switching to sponge-and-dough. |
| Rapid staling — crumb firm within 12–24 hours | No anti-staling enzyme or emulsifier in the formula. CBP and ADD bread stales faster than sponge-and-dough bread without anti-staling systems. | CBP, ADD (most critical); Straight dough also if packed same day | Add maltogenic amylase and/or MDG E471 via improver selection. For pre-packaged bread: consider calcium propionate E282 (verify legal limit) and controlled atmosphere packaging. |
| Pale, under-coloured crust | Insufficient sugar available for Maillard reaction at bake time (consumed by yeast during long fermentation or over-proof); insufficient oven temperature; steam not removed. | All methods, especially long-ferment straight dough or sponge | Add diastatic malt (0.5–1% on flour) to supply fermentable sugars from starch breakdown. Ensure oven temperature and vent timing correct. Check proof is not excessive. |
| Flying crust (top crust detaches from crumb) | Over-proof combined with high steam: crust forms unevenly while crumb is still expanding. Also caused by cold dough placed into hot oven (sudden condensation on surface). | All methods | Reduce final proof time. Ensure dough is at room temperature before loading. Optimise steam timing — give steam for first 5–8 min then vent. |
- Value:
- approximately 11–13
- Unit:
- Wh/kg of dough
- Confidence:
- medium
- Note:
- BAKERpedia gives ~11 Wh/kg; Campden BRI blog (direct institutional successor to BBIRA where CBP was developed) confirms 'around 11 Wh/kg for standard UK bread flours, with stronger flours requiring 12–13 Wh/kg'; ASBE independently states '11–13 Wh/kg is typical for CBP'. Confidence upgraded to medium. Note: 1 Wh = 3.6 kJ, so 11 Wh/kg ≈ 40 kJ/kg (the previous article text incorrectly stated 11 kJ/kg — corrected to approx 40–47 kJ/kg).
- Value:
- approximately 50–75
- Unit:
- ppm on flour weight
- Confidence:
- low
- Note:
- Single-source (BAKERpedia). Widely cited in trade literature but no second independent source confirmed in this research. Higher or lower dosages may be used depending on flour variety and protein level.
- Value:
- typically 2.5–3
- Unit:
- % fresh yeast on flour
- Confidence:
- low
- Note:
- Single-source (BAKERpedia). Higher than straight dough because no bulk fermentation.
- Value:
- 1–3
- Unit:
- hours at 26–28°C
- Confidence:
- high
- Note:
- Confirmed by both IREKS Compendium and BAKERpedia. Actual time varies with yeast level and temperature.
- Value:
- 3–6
- Unit:
- hours at 26–28°C (or overnight at 18°C)
- Confidence:
- medium
- Note:
- Single commercial source (Federation of Bakers). Widely accepted in UK trade practice.
- Value:
- 35–40
- Unit:
- °C
- Confidence:
- high
- Note:
- BAKERpedia. Consistent with spec sheet process notes which target 28°C dough temperature (room-temperature proofing equivalent).
- Value:
- approximately 85
- Unit:
- % relative humidity
- Confidence:
- medium
- Note:
- Single-source (BAKERpedia). Widely practised commercially.
- Value:
- 56–85
- Unit:
- °C
- Confidence:
- high
- Note:
- Modernist Cuisine. Widely confirmed in food science literature. Range reflects different starch fractions (amylose vs amylopectin; wheat vs other cereals).
- Value:
- 93–99 (lean bread); 88–93 (enriched dough)
- Unit:
- °C
- Confidence:
- medium
- Note:
- BAKERpedia is cited but does not explicitly state this range on the retrieved page. Modernist Cuisine gives 91–93°C for crumb structural set. ThermoWorks and King Arthur Baking independently confirm 96–99°C for lean doughs and 82–93°C for enriched. Range qualified by bread type. These are quality best-practice targets, not legal minima under UK or EU food safety law.
- Value:
- 26–28
- Unit:
- °C
- Confidence:
- high
- Note:
- Confirmed by IREKS Compendium and two spec sheets. Both Ciabatta Mix and Optimax Free application recipes explicitly state 28°C.
- Value:
- 1–5
- Unit:
- % on flour weight
- Confidence:
- high
- Note:
- Stated directly in Aromaferm Wheat & Malt Ferment 110 spec sheet.
- Value:
- approximately 3.3
- Unit:
- pH
- Confidence:
- high
- Note:
- Stated directly in spec sheet. Typical of concentrated dried sourdoughs.
- Value:
- 0.5–2
- Unit:
- % on flour weight (product-dependent)
- Confidence:
- high
- Note:
- Directly from Zeelandia Gamma GP product information: tin bread 0.5–0.75%, bloomers 1%, soft rolls 1.5%, crusty rolls and wholemeal 2%.
- Value:
- 60–90
- Unit:
- minutes
- Confidence:
- high
- Note:
- From IREKS Ciabatta Mix spec sheet/brochure. Focaccia variant uses only 30 min.
- Value:
- 8 min low + 2 min high
- Unit:
- minutes by speed
- Confidence:
- high
- Note:
- From Zeelandia Optimax Free spec sheet application recipe.
Buy the ingredients
Catalogue products and brands referenced in this article.

Wheat Flour Type 850 25 kg

Domson Bread Flour Type 750 25 kg
Optimax Free Bread Improver 20 kg

Puratos Purapan Mixed Bread Improver 10 kg
Rye Stabil Improver 25 kg

Intenso Extra Bread Improver 25 kg
L-1 Liquid Bread Improver 10 kg
LC-POWER Universal Bread Improver 25 kg

Windrush Strong White Bread Flour 16 kg

Zeelandia Gamma GP Bread Improver 12.5 kg

Puratos Easy Baguette SG 15 kg

Aromaferm Wheat & Malt Ferment 110 12.5 kg

Ireks Ciabatta Mix 25 kg